2021. 12. 19. 23:23ㆍSpring Boot/Information
해당 글에는 Retrofit, GraphQL이 나오니 만약 이중 하나를 모른다면 이해가 어려울 수 있다.
아래 링크를 통해 먼저 알고 가도록 하자.
[ 완성 코드 보러가기 ]
→ Branch: gql_query
[ Dev Spec : Kotlin, build.gradle.kts(Kotlin), Spring Boot 2.6, JDK11 ]
이번에는 Spring Boot로 Graph QL을 적용 시켜 봤다.
Database까지 연결하지는 않고, 간단하게 테스트만 하면서 경험해보는 것이라 Fake Rest API를 이용해 데이터를 받아와 Graph QL로 데이터를 보내주는 형식으로 진행하였다.
먼저 아래 의존성을 추가해주어야 한다.
build.gradle.kts
// Graph QL
implementation("com.graphql-java:graphql-spring-boot-starter:5.0.2")
implementation("com.graphql-java:graphql-java-tools:5.2.4")

// Retrofit
implementation("com.squareup.retrofit2:retrofit:2.7.2")
implementation("com.squareup.okhttp3:logging-interceptor:3.9.0")
implementation("com.squareup.retrofit2:converter-gson:2.7.2")
implementation("com.google.code.gson:gson:2.8.5")

// Spring Constructor Dependency Inject.
implementation("javax.inject:javax.inject:1")
Database까지는 구현하지 않고, Fake Rest API를 이용할 것 이기 때문에 Retrofit을 추가한 것이다.
만약 Database로 연결을 하겠다 라고 하면 JPA나 다른 의존성을 추가해주어야 한다.
Retrofit 서비스를 간단하게 구현해주자.
Fake Rest API는 아래 링크에 있는 것으로 구현하였다.
[ https://jsonplaceholder.typicode.com/ ]
application.yml
server:
  port: 8080

jsonPlaceHolder:
  apiAddress: "https://jsonplaceholder.typicode.com/"
ApiServiceContext.kt
import okhttp3.OkHttpClient
import okhttp3.logging.HttpLoggingInterceptor
import retrofit2.Retrofit
import retrofit2.converter.gson.GsonConverterFactory
import shin.yongha.springgql.retrofit.jsonplaceholder.JsonPlaceHolderInterface
import java.time.LocalDateTime
import java.util.concurrent.TimeUnit

class ApiServiceContext(
    private val baseApiUrl: String,
    private val timeoutSecond: Long
) {

    private lateinit var retrofit: Retrofit

    init {
        val baseUrl = if(!baseApiUrl.endsWith("/")) {
            "$baseApiUrl/"
        } else {
            baseApiUrl
        }

        val loggingInterceptor = HttpLoggingInterceptor {
            val time = LocalDateTime.now()
            println("${time.hour}:${time.minute.toString().padStart(2, '0')}:${time.second.toString().padStart(2, '0')} : $it")
        }.apply { level = HttpLoggingInterceptor.Level.BODY }

        val client = OkHttpClient.Builder()
            .connectTimeout(timeoutSecond, TimeUnit.SECONDS)
            .writeTimeout(timeoutSecond, TimeUnit.SECONDS)
            .readTimeout(timeoutSecond, TimeUnit.SECONDS)
            .cache(null)
            .addInterceptor(loggingInterceptor)
            .build()

        retrofit = Retrofit.Builder()
            .baseUrl(baseUrl)
            .client(client)
            .addConverterFactory(GsonConverterFactory.create())
            .build()
    }

    fun getApiService(): JsonPlaceHolderInterface {
        return retrofit.create(JsonPlaceHolderInterface::class.java)
    }
}
JsonPlaceHolderInterface.kt
import retrofit2.Call
import retrofit2.http.GET
import shin.yongha.springgql.model.api.CommentDTO
import shin.yongha.springgql.model.api.PostDTO

interface JsonPlaceHolderInterface {
    @GET("/posts")
    fun getPosts(): Call<List<PostDTO>>
    @GET("/comments")
    fun getComments(): Call<List<CommentDTO>>
}
CommentDTO.kt
import com.google.gson.annotations.SerializedName

data class CommentDTO(
    @SerializedName("postId")
    val postId: Long,
    @SerializedName("id")
    val id: Long,
    @SerializedName("name")
    val name: String,
    @SerializedName("email")
    val email: String,
    @SerializedName("body")
    val body: String,
)
PostDTO.kt
import com.google.gson.annotations.SerializedName

data class PostDTO(
    @SerializedName("userId")
    val userId: Long,
    @SerializedName("id")
    val id: Long,
    @SerializedName("title")
    val title: String,
    @SerializedName("body")
    val body: String,
)
ApiService.kt
import ApiServiceContext
import org.springframework.core.env.Environment
import org.springframework.stereotype.Service
import retrofit2.Call
import shin.yongha.springgql.model.api.CommentDTO
import shin.yongha.springgql.model.api.PostDTO
import shin.yongha.springgql.retrofit.jsonplaceholder.JsonPlaceHolderInterface
import javax.inject.Inject

@Service
class ApiService @Inject constructor(
    private val environment: Environment
) {
    private var jsonPlaceHolderInterface: JsonPlaceHolderInterface? = null
    init {
        val apiAddress = environment.getProperty("jsonPlaceHolder.apiAddress")
        if(!apiAddress.isNullOrEmpty()) {
            jsonPlaceHolderInterface = ApiServiceContext(apiAddress, 60L).getApiService()
        } else {
            throw Exception("API 주소가 정의되지 않았습니다.")
        }
    }

    fun getPosts(): List<PostDTO> {
        return call(jsonPlaceHolderInterface?.getPosts())
    }

    fun getComments(): List<CommentDTO> {
        return call(jsonPlaceHolderInterface?.getComments())
    }

    private fun<T> call(t: Call<T>?): T {
        if(t == null) {
            throw Exception("API Service 가 없습니다.")
        }  else {
            val result = t.execute().body()
            if (result == null) {
                throw Exception("${t.javaClass.simpleName} 을 불러오지 못했습니다.")
            } else {
                return result
            }
        }
    }

}
ApiService Class를 이용해 resolvers에서 API를 호출할 것이며, 그 위에 있는 코드들은 ApiService Class가 정상작동 되기 위한 사전 작업임만 이해하면 된다.
(GraphQL 적용하는것보다 Retrofit 구성하는게 더 많은 것 같다..)
Retrofit에 대한 설명은 이 게시글 내용에 주가 아니니 스킵하도록 하겠다.(맨 위 Retroift Link에 가보면 전부 다 써있다.)
이제 GraphQL을 구현해 볼 것인데, 생각보다 굉장히 쉽고 간단하다.
먼저, resources에 graphql schema, type들을 정의해주도록 하자.
파일 이름은 *.graphql, *.graphqls 두개중 하나로 선택하여 작성하면 되고, domain 별로 폴더 분리도 진행할 수 있으니 참고하여 작성하도록 하자.
(웬만하면 한개의 확장자로 가져가는 것이 좋다. 나중에 yml에서 확장자를 고정할 수 있다.)
먼저 우리는 GraphQL을 통해 Fake Rest API에 있는 게시글과, 댓글을 뽑아올 것인데 이에 대한 Type을 정의해주어야 한다.
resources/graphql/comment/comment.graphqls
type Comment {
    postId: Int!,
    id: Int!,
    name: String!,
    email: String!,
    body: String!,
}
resources/graphql/post/post.graphqls
type Post {
    userId: Int!,
    id: Int!,
    title: String!,
    body: String!,
}
post와 comment에 대한 type을 모두 정의했으면, 이제 Root schema를 정의해주고 Root query를 정의해 주어야 한다.
여기서 schema와 type의 개념이 중요한데 schema는 GraphQL 호출시 사용될 prefix 같은 개념이라고 생각하면 된다.
resources/graphql/common.graphqls
schema {
    query: Query
}

# Root Query
type Query {
    getPost: [Post],
    getPostById(id: Int!): Post,
    getComment: [Comment],
    getCommentByPostId(postId: Int!): [Comment],
}
Root Query라고 주석이 되어 있는 곳을 보면 우리가 GraphQL로 무엇을 갖고올 수 있게 할지에 대한 것을 작성하였다.
먼저 처음 getPost는 post 전부를 갖고오는 것이고, getPostById는 Post 1개만 가져오는 기능이다.
그 아래는 comment들을 갖고오는 기능인데, byPostId로 조건이 달려있는 query의 응답값이 Comment Array인 것을 볼 수 있다.
이는 Comment는 1개의 PostId에 여러개 달릴 수 있기 때문에 Array 처리를 진행한 것이다.
위처럼 Query를 전부 다 작성했으면 이제 resolover를 작성하러 가면 된다.
resolver를 작성할 때 Root Query에 있는 이름 그대로를 따라가면 되고, 조건 또한 따라서 맞추면 된다.
PostQueryResolver.kt
import com.coxautodev.graphql.tools.GraphQLQueryResolver
import lombok.RequiredArgsConstructor
import org.springframework.stereotype.Component
import shin.yongha.springgql.model.api.PostDTO
import shin.yongha.springgql.service.ApiService
import javax.inject.Inject

@RequiredArgsConstructor
@Component
class PostQueryResolver @Inject constructor(
    private val apiService: ApiService
) : GraphQLQueryResolver {
    fun getPost(): List<PostDTO> {
        return apiService.getPosts()
    }

    fun getPostById(id: Long): PostDTO {
        if(id <= 0) {
            throw Exception("ID는 1 이상이어야 합니다.")
        }
        return apiService.getPosts()
            .find { post ->
                post.id == id
            } ?: throw Exception("데이터가 없습니다.")
    }
}
Query type에 getPost, getPostById를 변환한 것이다.(GraphQL → Kotlin)
그럼 Comment Resolver도 마저 작성하러 가자.
import com.coxautodev.graphql.tools.GraphQLQueryResolver
import lombok.RequiredArgsConstructor
import org.springframework.stereotype.Component
import shin.yongha.springgql.model.api.CommentDTO
import shin.yongha.springgql.service.ApiService
import javax.inject.Inject

@RequiredArgsConstructor
@Component
class CommentQueryResolver @Inject constructor(
    private val apiService: ApiService
) : GraphQLQueryResolver {
    fun getComment(): List<CommentDTO> {
        return apiService.getComments()
    }

    fun getCommentByPostId(postId: Long): List<CommentDTO> {
        if(postId <= 0) {
            throw Exception("ID는 1 이상이어야 합니다.")
        }
        return apiService.getComments()
            .filter { comment ->
                return@filter comment.postId == postId
            }
    }
}
위처럼 작성 되면 Resolver, Query 모두 끝나서 API를 호출해보면 된다.
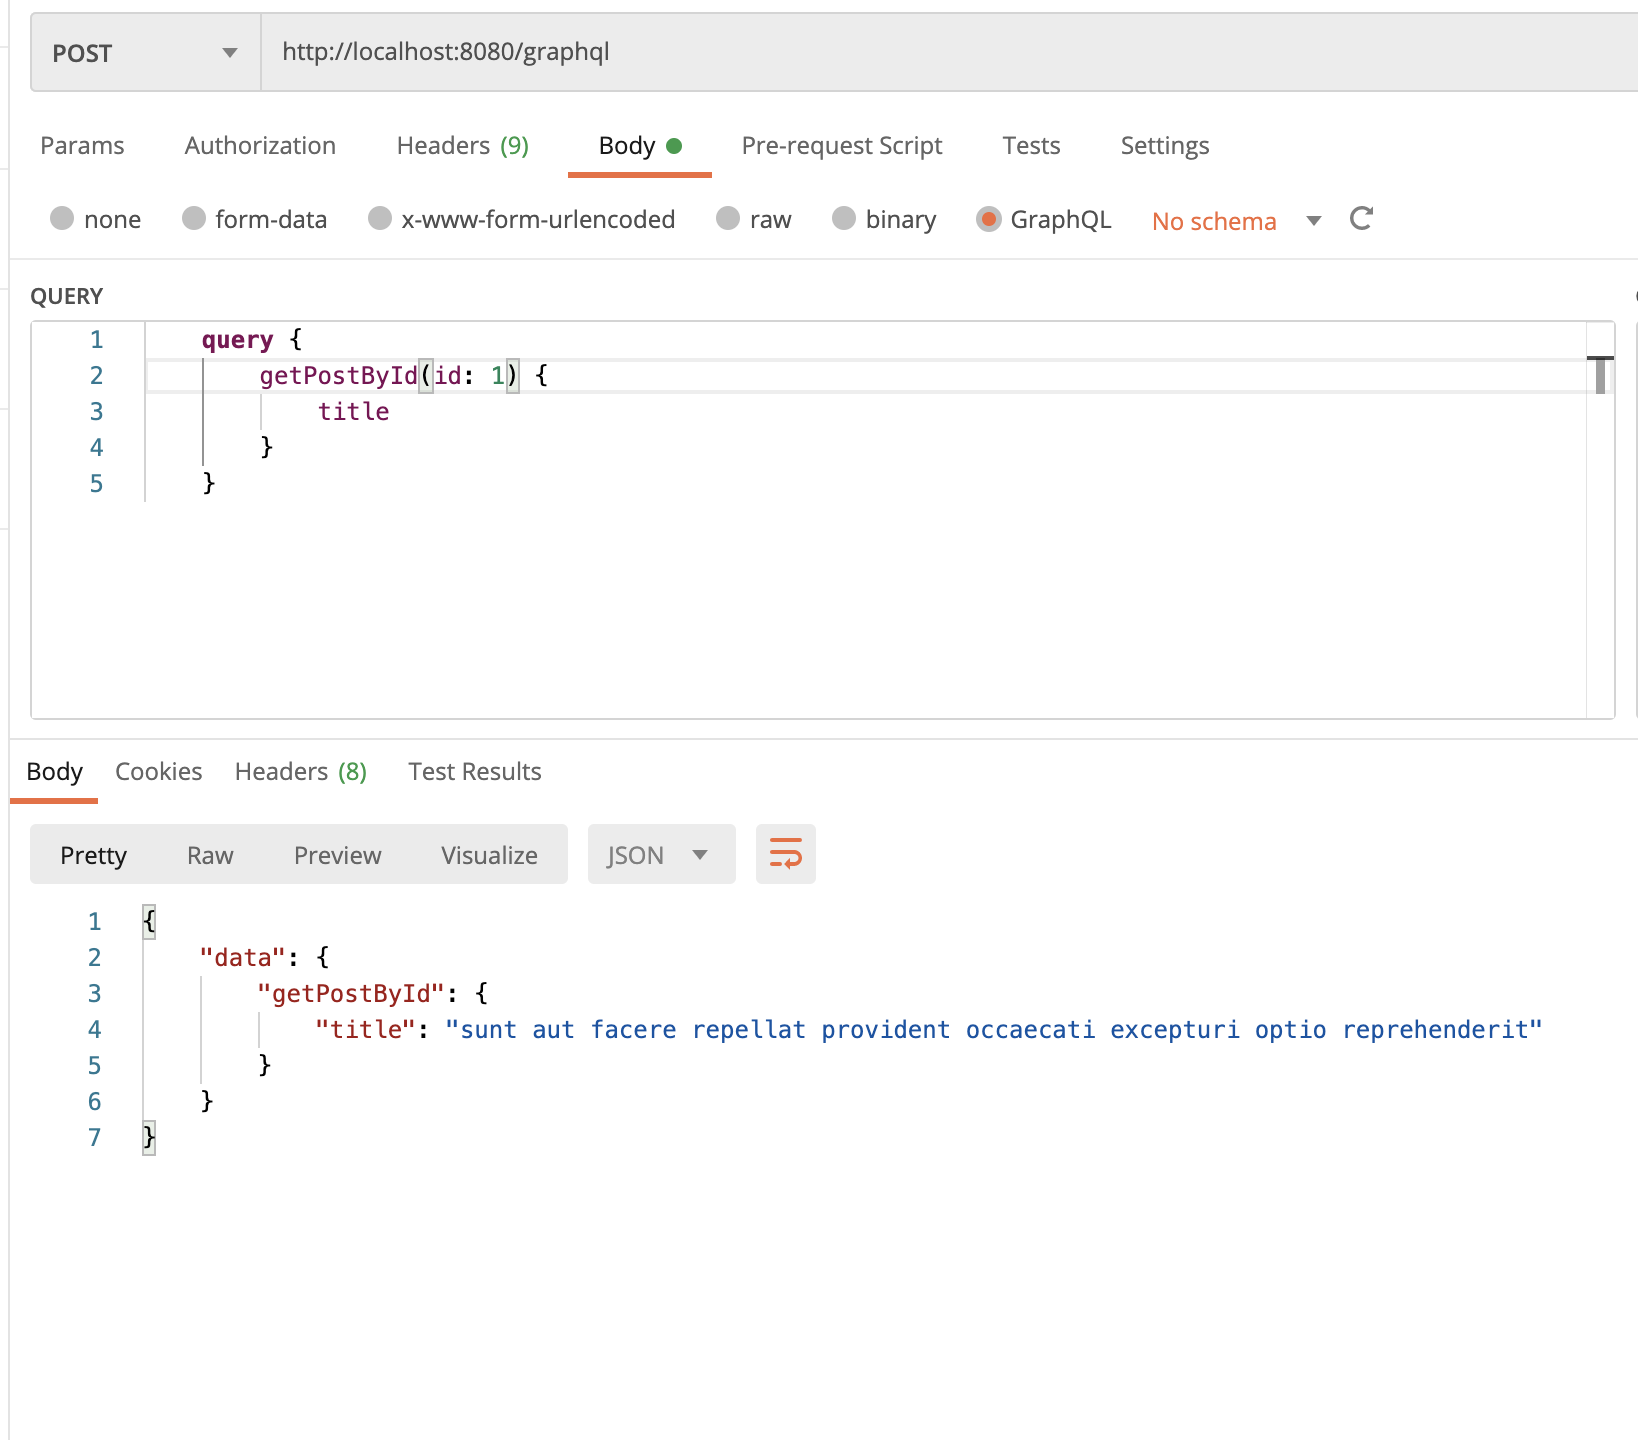
API의 endPoint는 1개(http://localhost:8080/graphql)이고, Query, Mutation으로 관리되는 Schema가 있다.
(경우에 따라 yml 설정으로 endPoint를 변경할 수 있다! 자세한 내용은 코드의 application.yml 을 보면 전부 작성해놨다.)
하지만 본 포스팅에서는 Query에 대해서만 다루고 있으며 Mutation은 이 후에 따로 진행할 것이다.
그럼 Spring boot를 실행해보고 API를 호출해보도록 하자.
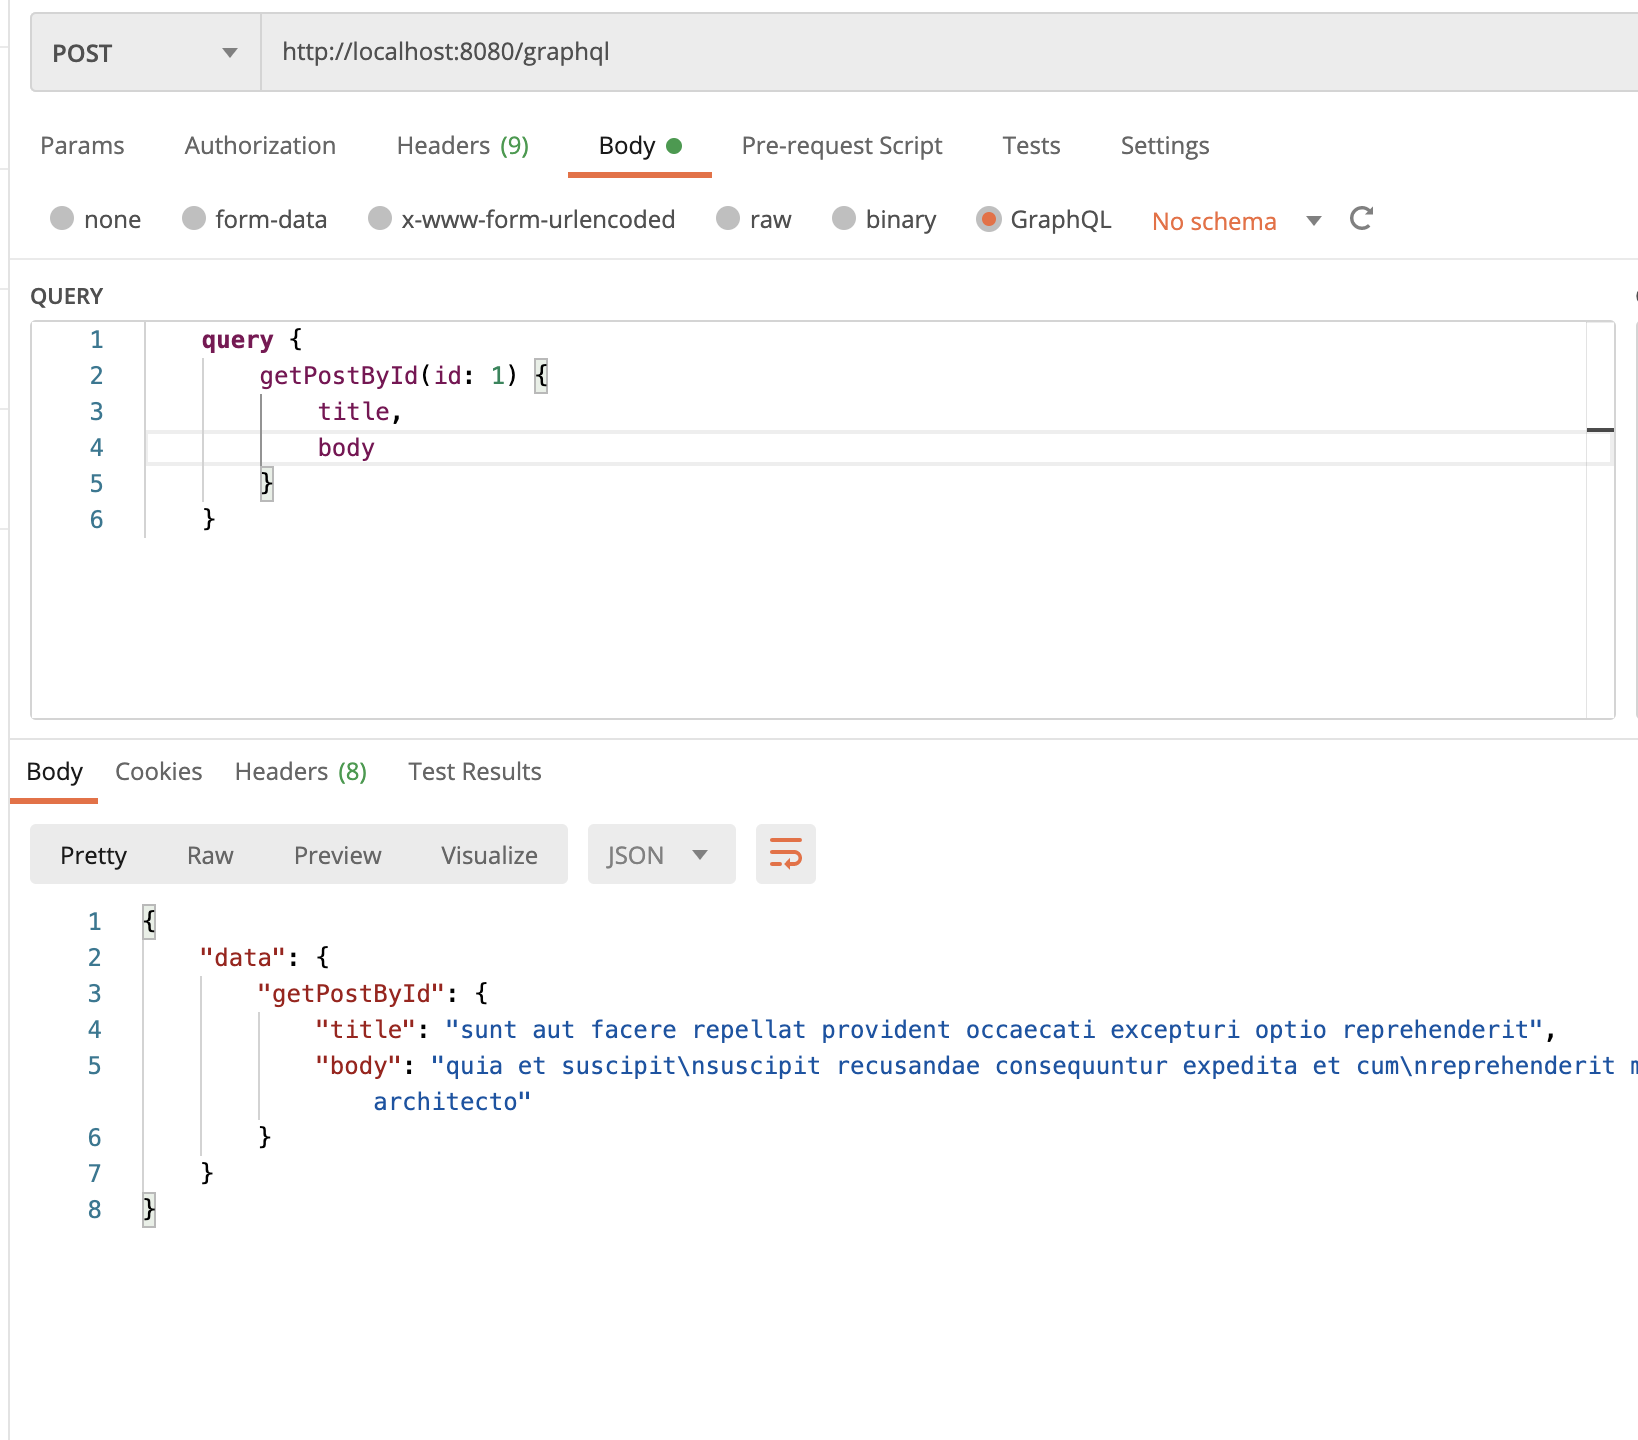
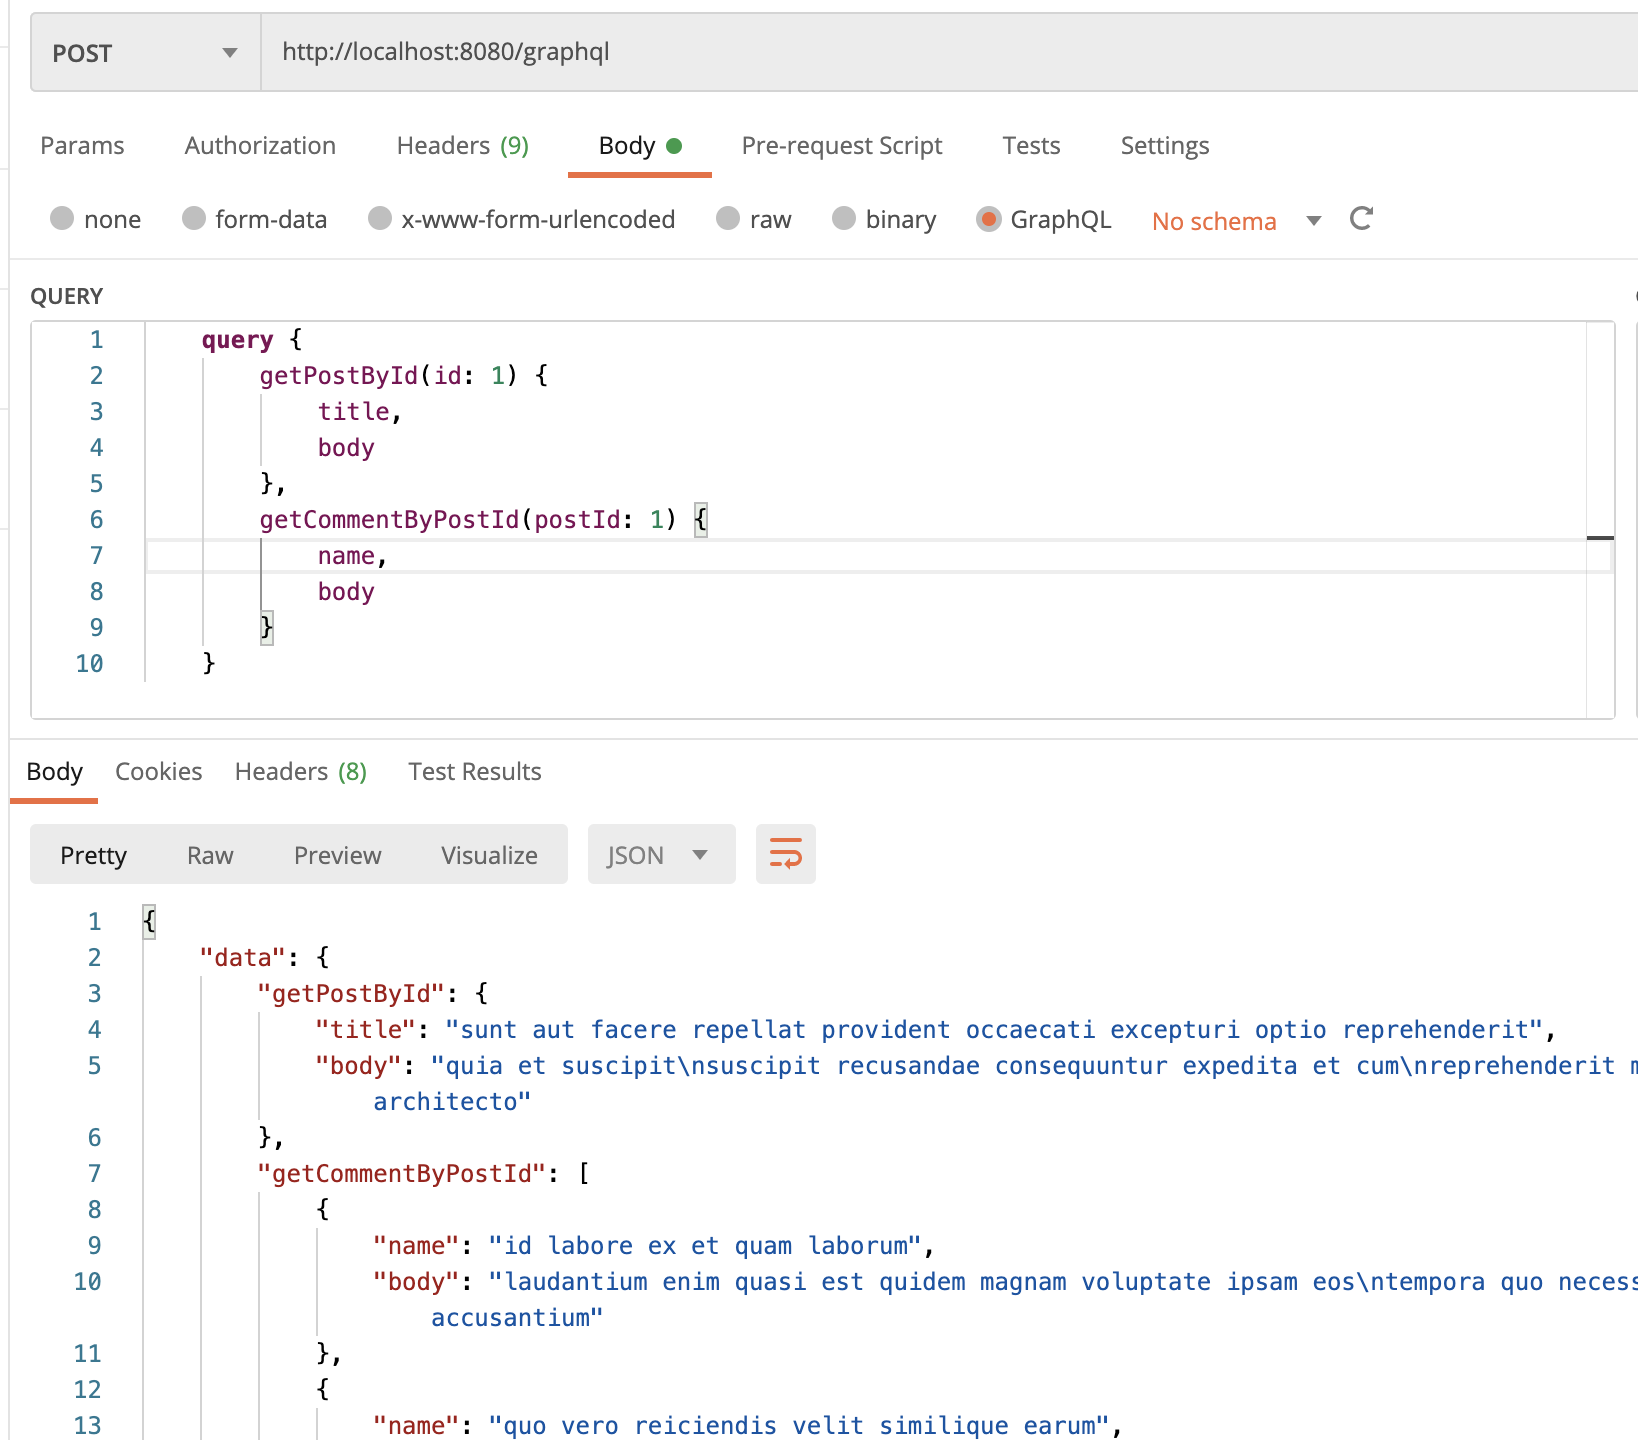
API 호출은 Postman을 이용해 진행하였으며, 정상적으로 불러와 지는 것을 확인할 수 있다.
마치며
개념적인 부분은 모두 이 전 글에서 설명을 진행했기 때문에 이번에는 코드 중점적으로만 보였다.
아직 깊게는 들어가보지 못하고, 이런식으로 구현하는구나 만 알아가는 단계이기 때문에 Resolver가 안에서는 어떻게 자세히 동작하는지에 대해서는 더 공부를 해봐야 한다.
구현도 굉장히 쉽고, BE수정 없이 원하는 필드를 마음대로 수정할 수 있다는게 굉장히 인상적인 것 같다.
참고문서)
https://velog.io/@jay2u8809/SpringBoot-GraphQL%EC%9D%84-%EC%8D%A8%EB%B3%B4%EC%9E%90
'Spring Boot > Information' 카테고리의 다른 글
| [GraphQL] Spring Boot로 Graph QL 적용하기 (2) (0) | 2021.12.20 |
|---|---|
| [JWT] JWT Token 정리 (0) | 2021.12.14 |
| [Spring Boot] REST API 구축시 Local Date Time 받기 (0) | 2021.11.10 |
| [build.gradle.kts] Spring Build 파일 실행시 ReactJS도 같이 실행하는 방법(3) (0) | 2021.11.08 |
| [Spring Boot] Kotlin + Gradle MyBatis 연동 (0) | 2021.11.02 |