2021. 10. 27. 18:25ㆍSpring Boot/Information
이 방법은 현재 프로젝트를 진행하면서, Kotlin을 이용해 Spring Boot를 실행시키고, Spring Boot가 실행되었을 때 ReactJS도 같이 실행시키고자 하여 찾은 방법이다.
(Spring Server와 React Server를 분리하지 않고 한개의 서버에서만 작동시키기 위함이다.)
먼저 이 작업을 왜하냐면, Web Application Server와 Spring Server가 분리되있으면 일단 same-origin이 아니기 때문에 API 통신에 규약이 생길 수 있고, Spring에서 Servlet을 이용해 특정 작업을 할때 Throw 될 수 있기 때문이다.
(하지만 프로젝트 특성상 분리가 되어야하는 프로젝트도 있으니, 반드시 이 방법이 정답이 아니라는 것만 참고하면 된다.)
Build Tool은 Gradle을 이용하며, Groovy 방식이 아닌 Kotlin(kts) 으로 작성되어있다는 부분을 참고하면 될 것 같다.
먼저 기본적인 React Project와 Spring Project를 생성해주자.
내 경우에는 IntelliJ IDEA를 이용하여 개발을 진행하고 있으므로, IntelliJ IDEA 내부 기능을 이용해 Spring Project를 먼저 생성해주었다.
(사실 이 방법을 이용하게 되면 ReactJS 뿐 아니라 Angular도 똑같이 작업을 할 수 있다.)
생성하기 전, Module 단위로 분리를 시킬 것 이기 때문에 아래 명령어를 이용해 기본이 될 Root Project를 생성해주자.
gradle init위 명령어를 입력하게 되면, 아래와 같이 선택지가 나온다.
Starting a Gradle Daemon, 1 busy and 2 incompatible Daemons could not be reused, use --status for details

Select type of project to generate:
  1: basic
  2: cpp-application
  3: cpp-library
  4: groovy-application
  5: groovy-library
  6: java-application
  7: java-library
  8: kotlin-application
  9: kotlin-library
  10: scala-library
Enter selection (default: basic) [1..10]
Root Project를 구성하는 것이니, 1번을 입력하여 basic으로 Project를 생성한다.
Select build script DSL:
  1: groovy
  2: kotlin
Enter selection (default: groovy) [1..2]
그 후에 Build Script DSL을 선택하라고 나오는데 위에 기술한 바와 같이 kotlin을 이용하여 제작할 것 이기 때문에 2번을 입력한다.
이 후 project-name을 작성하라고 나오는 부분은 본인이 정하여 작성하고 엔터를 누르면 된다.

그럼 위와 같이 생성이 되어 있을 것이다.
여기서 Spring-Project 를 추가해줘야 하니 자신의 project를 우클릭하여 New - Module을 클릭하여 Module을 만들어주자.
New Module 팝업에서는 Spring initializer를 선택해 Spring Project를 생성해주도록 하자.
설정은 아래와 같이 하면 된다.

Java 버전은 11을 이용하기로 했고, Build Tool은 Gradle, 그에 대한 Language는 Kotlin으로 선택한 것 이다.
War파일을 이용하여 Tomcat을 실행시킬거면 War 파일을 선택하면 된다.
여기서는 Jar 파일로 압축하여 Spring을 구동시킬 것이라 Jar로 선택했다.
정상적으로 생성이 되었으면 아래와 같은 폴더구조가 되었을 것이다.
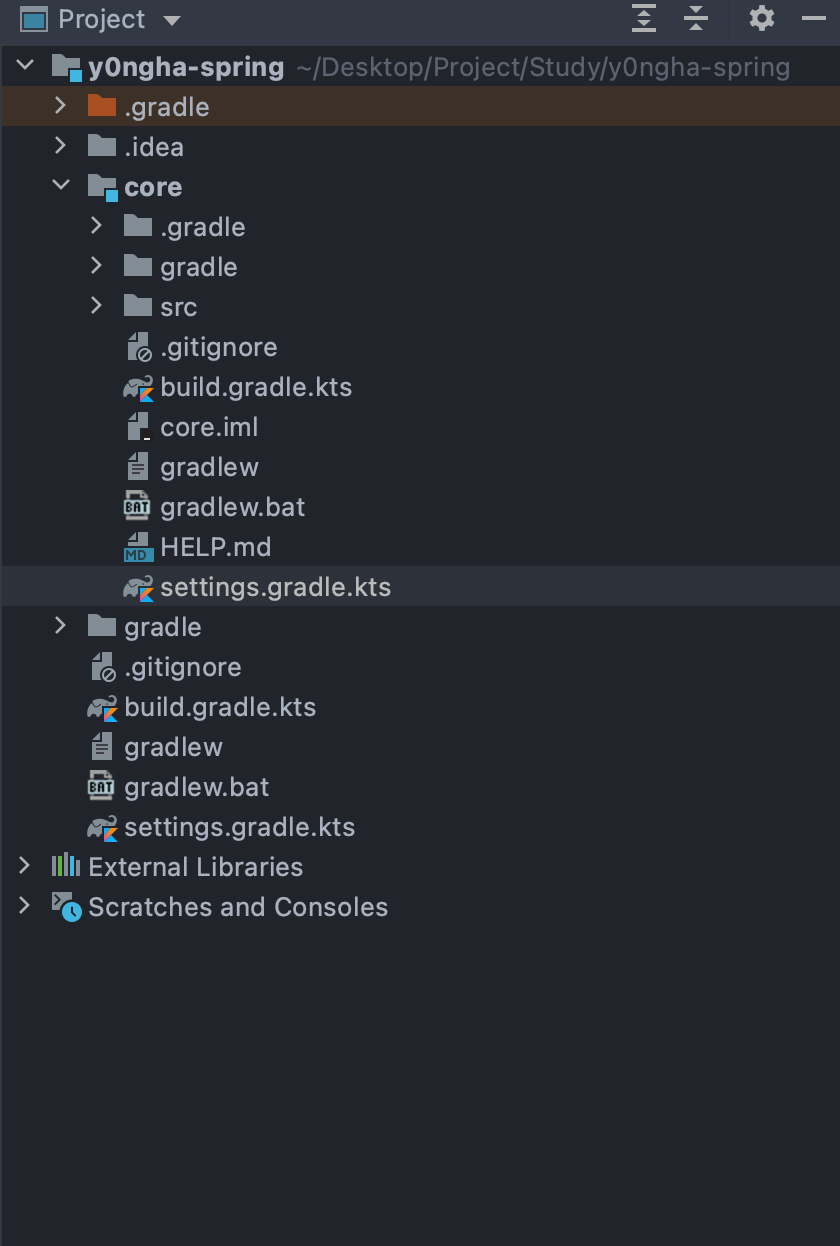
여기서 일단 쓸데없는 파일을들 좀 정리해주자.
쓸데없는 파일은 아래 파일들이다.
gradlew
gradlew.bat
settings.gradle.kts
gradle
.gradle
위 파일들이 왜 필요없냐면, 어차피 Root Project에서 전부 다 Include 시킬 것이라서 필요 없다.
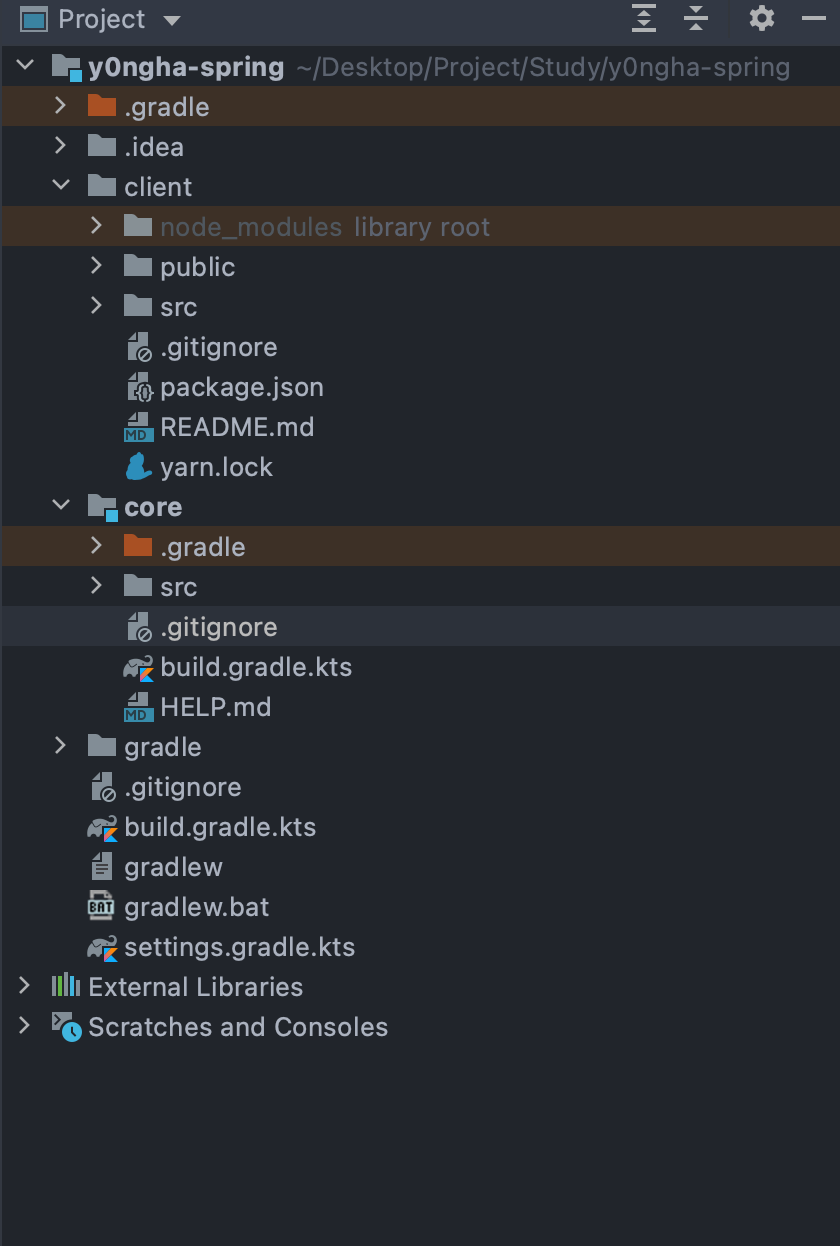
이 다음, React-Module을 만들어주자.
React-Module을 만드는 방법은 아래 명령어를 입력하면 된다.
npx create-react-app client뒤에 client는 지금 내 경우에 Core Module과 Client Module을 분리하여 개발을 진행하기 때문에 이름을 나눠놓은 것 이다.
정상적으로 생성이 되었다면 아래와 같은 폴더 구조를 갖게된다.
여기까지 됐으면 기본적인 프로젝트 셋팅은 끝났다.
아, 그리고 Root Project의 Sub Module로 core(Spring Project)가 생성된 것인데, 이 때 Gradle에 자동으로 Link 되기 때문에, Link를 해제하면 된다. (우측 Gradle Task에서 UnLink core 진행)
이 다음, Sub Module의 build.gradle.kts와 Root Project의 build.gradle.kts, settings.gradle.kts를 수정해주면 된다.
먼저 settings.gradle.kts는 아래와 같이 수정하여 특정 Module을 Include할 수 있게끔 진행해주자.
/*
 * This file was generated by the Gradle 'init' task.
 *
 * The settings file is used to specify which projects to include in your build.
 *
 * Detailed information about configuring a multi-project build in Gradle can be found
 * in the user manual at https://docs.gradle.org/5.3.1/userguide/multi_project_builds.html
 */

rootProject.name = "y0ngha-spring"
include(":core")
그리고, Root Project의 build.gradle.kts가 텅텅 비어있을텐데, 여기에 아래와 같이 코드들을 추가해주자.
|
1
2
3
4
5
6
7
8
9
10
11
12
13
14
15
16
17
18
19
20
21
22
23
24
25
26
27
28
29
30
|
plugins {
id("groovy")
}
buildscript {
repositories {
google()
jcenter()
mavenCentral()
}
}
java {
sourceCompatibility = JavaVersion.VERSION_11
targetCompatibility = JavaVersion.VERSION_11
}
allprojects {
repositories {
google()
jcenter()
mavenCentral()
maven { setUrl("https://jitpack.io") }
}
}
subprojects {
group = "prv.y0ngha"
version = "0.0.1-SNAPSHOT"
}
|
cs |
allprojects Block은 모든 프로젝트 단위들에 대하여 설정하는 블럭이고, subprojects Block은 Module 단위들에 대해 설정하는 블럭이라 생각하면 편히 이해가 된다.
(내부에 특정 프로젝트만 설정을 바꿀 수 있다.)
위처럼 하면 Root Project의 설정은 끝났고, 이제 core(Spring Boot) Module의 build.gradle.kts를 수정해주도록 하자.
Root Project의 build.gradle.kts에서 설정한 내용과 중복되는 내용만 제거한 것이다.
|
1
2
3
4
5
6
7
8
9
10
11
12
13
14
15
16
17
18
19
20
21
22
|
plugins {
id("org.springframework.boot") version "2.5.6"
id("io.spring.dependency-management") version "1.0.11.RELEASE"
kotlin("jvm") version "1.5.31"
kotlin("plugin.spring") version "1.5.31"
}
configurations {
compileOnly {
extendsFrom(configurations.annotationProcessor.get())
}
}
dependencies {
implementation("org.springframework.boot:spring-boot-starter-web")
implementation("com.fasterxml.jackson.module:jackson-module-kotlin")
implementation("org.jetbrains.kotlin:kotlin-reflect")
implementation("org.jetbrains.kotlin:kotlin-stdlib-jdk8")
compileOnly("org.projectlombok:lombok")
annotationProcessor("org.projectlombok:lombok")
testImplementation("org.springframework.boot:spring-boot-starter-test")
}
|
cs |
일단 여기까지 문제가 없는지 Gradle ReImport를 통해 Build를 다시 한번 진행해보고, 문제가 없으면 넘어가면 된다.
※ 혹시 아래와 같은 오류가 나온다면, Root Project의 'gradle/wrapper/gradle-wrapper.properties' 파일의 내용을 확인하면 된다.
An exception occurred applying plugin request [id: 'org.springframework.boot', version: '2.5.6']
> Failed to apply plugin [id 'org.springframework.boot']
   > Spring Boot plugin requires Gradle 6.8.x, 6.9.x, or 7.x. The current version is Gradle 5.3.1
org.springframework.boot Plugin을 이용하려면 Gradle의 버전이 6.8.x, 6.9.x, 7.x 여야 하는데 틀리다는 것이다.
위 경로의 파일에 들어가 'distributionUrl' 항목을 수정해주면 된다.
예) distributionUrl=https\://services.gradle.org/distributions/gradle-5.3.1-bin.zip → distributionUrl=https\://services.gradle.org/distributions/gradle-7.1.1-bin.zip
이 후 Build Script 작성은 다음 글에 기술하도록 하겠다.
'Spring Boot > Information' 카테고리의 다른 글
| [JWT] JWT Token 정리 (0) | 2021.12.14 |
|---|---|
| [Spring Boot] REST API 구축시 Local Date Time 받기 (0) | 2021.11.10 |
| [build.gradle.kts] Spring Build 파일 실행시 ReactJS도 같이 실행하는 방법(3) (0) | 2021.11.08 |
| [Spring Boot] Kotlin + Gradle MyBatis 연동 (0) | 2021.11.02 |
| [build.gradle.kts] Spring Build 파일 실행시 ReactJS도 같이 실행하는 방법(2) (0) | 2021.10.27 |